Fundamentals of the Straight-Line Cast
Fundamentals of the Straight-Line Cast
Instruction By Dusty Sprague
Fundamentals of a Straight-line Cast
Dusty Sprague
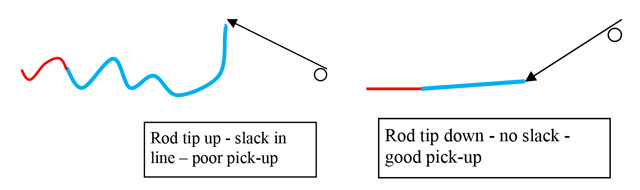
• Pick-Up without Slack Line. The rod needs to pull against the weight of the entire line and leader extended beyond the rod tip when the cast begins – no slack in the line or leader. Hold the rod tip close to the surface and strip in enough line to get the fly moving. Smoothly lift the line off the water and into the initial back cast.
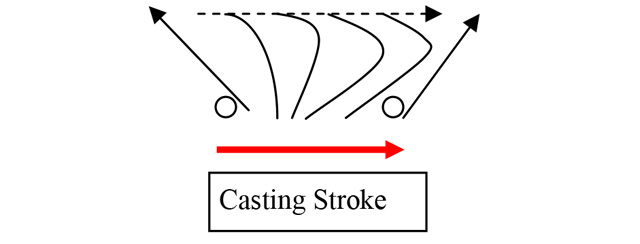
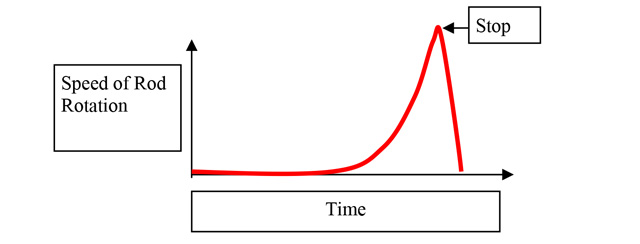
• Bend the Rod. Rod bend and line speed are needed to make the cast and result from rotating the rod at the end of the casting stroke. Rotating the shoulder, elbow or wrist, usually in some combination, rotates the rod. For short casts, little rod bend is needed and can result from a slight rotation of the wrist, elbow or shoulder alone, or in combination. Longer casts require more rod bend using longer casting strokes and are best achieved using a combined rotational movement of the shoulder, elbow and wrist. For long casts, begin with a smooth pulling motion to remove slack. Steadily increase speed, delaying rod rotation. End the cast by rapidly rotating the rod to an abrupt stop. The key is maximum rod tip speed at the end of the cast.
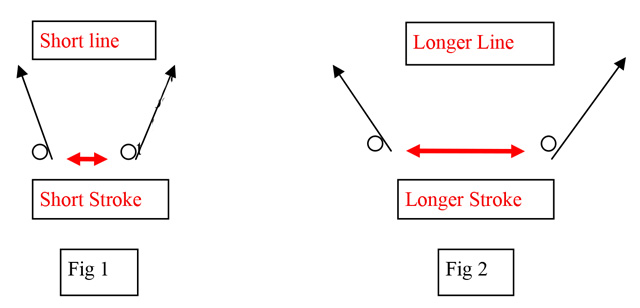
• Adjust the Stroke Length – the distance traveled by the hand during the casting stroke, from beginning of distinct acceleration to the stop. The length of the stroke varies with the length of line being cast. For a short straight-line cast use a short stroke – Figure 1. For a longer cast use a longer stroke -Figure 2. The path of the hand should be straight away from and straight to the target area.
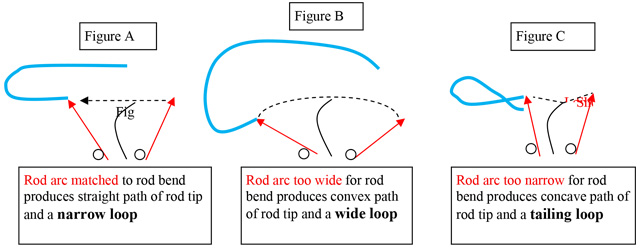
• Adjust the Rod Arc – the angle between the rod butt at the beginning of the cast and the stop position. The width of the angle should match the bend in the rod to maintain a relatively straight path of the rod tip. A relatively straight path of the rod tip produces a narrow loop of line. The rod tip should stop just below the on-coming line.
Adjust the rod arc to fit the bend in the rod. For short casts use a narrow arc; for longer casts use a wider arc. The intent in the figures below is to illustrate casts with the same amount of rod bend but with differing rod arcs. A rod arc matched to the bend in the rod will produce straight path of the rod tip and a narrow loop – Figure A. A rod arc too wide for the bend in the rod will produce a wide loop – Figure B. A rod arc too narrow for the bend in the rod will produce a tailing loop – Figure C.
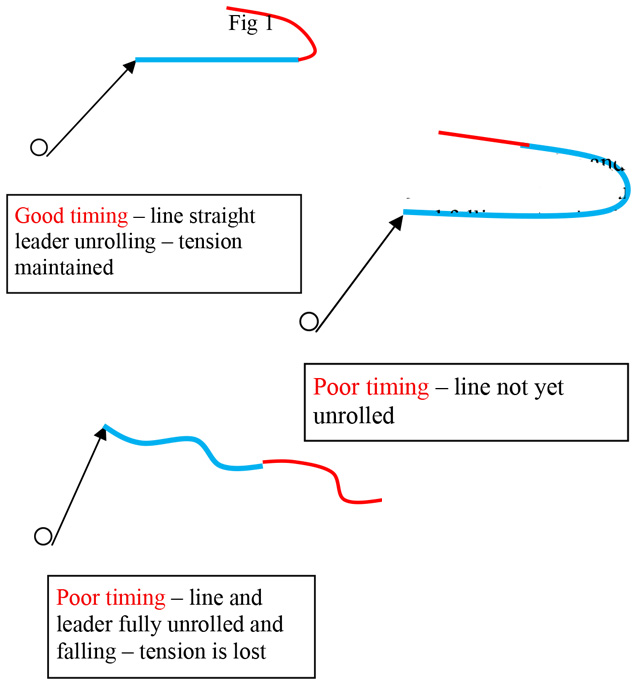
• Adjust Timing – the pause between strokes to allow the line to fully straighten without losing tension and falling dramatically. Wait between strokes to let the line straighten. Good timing – adequate pause – is long enough to allow the line to straighten fully with just the leader not yet straightened. Poor timing is not waiting long enough or waiting too long. Watch your back cast when you practice!
• Select the Casting Angle. For casting to close targets stop the hand low in front and higher in back, unrolling the line just above the target. For more distant targets the hand path should be more parallel with the water. To reach targets under obstacles, tilt the rod to the side, casting more parallel with the surface.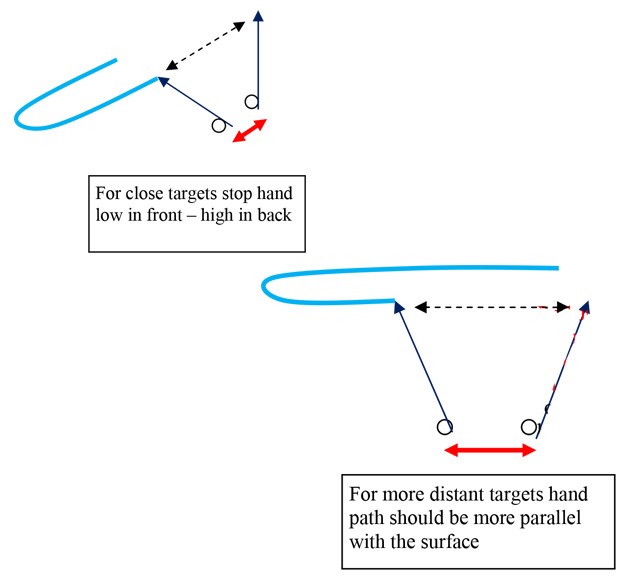
Good Casters Do the Following:
• Begin the cast by removing slack
• Select a casting angle in-line with the target
• Smoothly lift the line into the initial back cast, opposite the target
• Smoothly accelerate the hand along a straight path
• Rapidly rotate the rod at the end of the stroke
• Adjust the rod arc to fit the bend in the rod
• Stop the rod abruptly
• Pause to allow the line to straighten